![]()
[Jun-2026] Free CKA Exam Dumps to Improve Exam Score
2026 Realistic CKA Dumps Exam Tips Test Pdf Exam Material
NEW QUESTION # 43
Create a namespace called 'development' and a pod with image nginx called nginx on this namespace.
Answer:
Explanation:
See the solution below.
Explanation
kubectl create namespace development
kubectl run nginx --image=nginx --restart=Never -n development
NEW QUESTION # 44
Your Kubernetes cluster is experiencing a high number of pod restarts in the 'database-service' Deployment. The logs show errors related to "connection refused" from the database service. You need to diagnose the issue and resolve it.
Answer:
Explanation:
See the solution below with Step by Step Explanation.
Explanation:
Solution (Step by Step) :
1. Check the Database Service:
- Verify the database service is running and healthy:
- Use 'kubectl get services database-service' to check the service status.
- If the service is not running, try restarting it with 'kubectl delete service database-service' followed by 'kubectl apply -f database-service.yaml'
2. Investigate Network Connectivity:
- Check if pods in the 'database-service' Deployment can connect to the database service:
- Use 'kubectl exec -it -n bash' to enter a pod in the Deployment.
- Run 'ping database-service' or 'telnet database-service to test network connectivity.
- If ping or telnet fails, there might be a network issue between the pods and the database service.
3. Examine Service Configuration:
- Inspect the database service YAML:
- Verify the port mapping in the service definition matches the port that the database service listens on.
- Ensure the service selector matches the labels of the database pods.
- Example: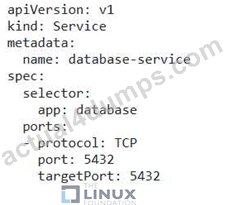
4. Check for Network Policies: - Determine if any network policies are blocking traffic between the database service and the pods: - Use 'kubectl get networkpolicies -n ' to list network policies. - Examine the policies to see if they are blocking traffic based on labels, ports, or other criteria. 5. Troubleshoot Database Service: - Verify the database service itself is running and accessible: - If you can access the database service directly from outside the cluster, but the pods cannot connect, there may be an issue with the database service itself. - Run tests to ensure the database is functioning correctly. 6. Test and Redeploy: - After making changes to the service definition, apply the update: - 'kubectl apply -f database-service.yaml' - Monitor the pod restarts. If the issue persists, consider further troubleshooting steps, such as inspecting firewall rules or DNS resolution.
NEW QUESTION # 45
You have a Kubernetes cluster with a variety of namespaces: 'default', 'development', 'production', and 'testing'. You need to implement granular role-based access control (RBAC) to ensure that:
- Developers in the 'development' namespace can only create and delete pods within that namespace.
- Developers in the 'testing' namespace can only create, delete and scale pods within that namespace.
- Production team members in the 'production' namespace can only view pods and deployments.
Provide the necessary YAML files for the Role, RoleBinding, and ServiceAccount objects to enforce these permissions. Ensure that the service accounts are bound to specific namespaces and that the RoleBindings are correctly defined to grant the necessary access to each group.
Answer:
Explanation:
See the solution below with Step by Step Explanation.
Explanation:
Solution (Step by Step) :
1 . Create a ServiceAccount for Developers in the 'development' namespace: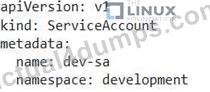
2. Create a ServiceAccount for Developers in the 'testing' namespace: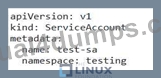
3. Create a ServiceAccount for Production Team members in the 'production' namespace: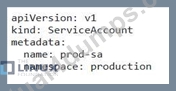
4. Create a Role for Developers in the 'development' namespace: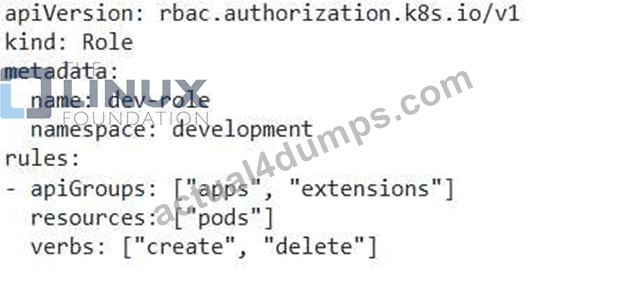
5. Create a Role for Developers in the 'testing' namespace: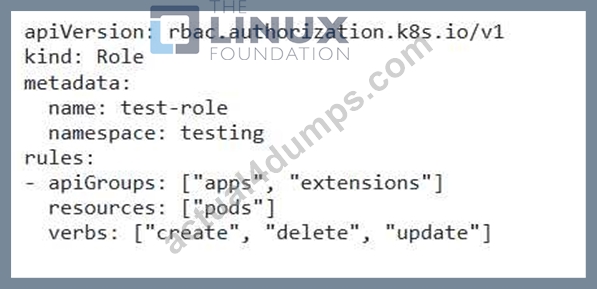
6. Create a Role for Production Team members in the 'production' namespace: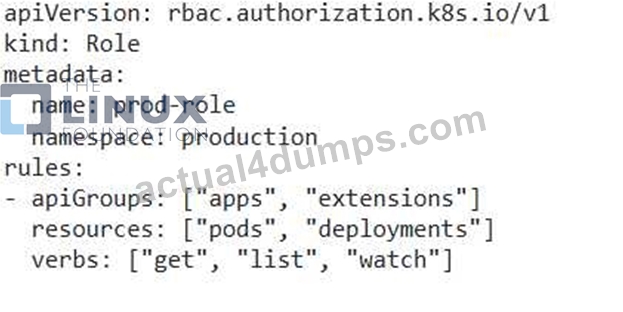
7. Create a RoleBinding for Developers in the 'development' namespace: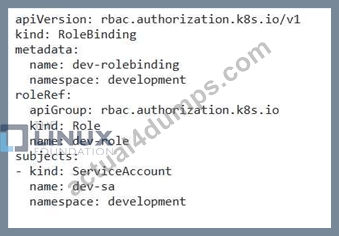
8. Create a RoleBinding for Developers in the 'testing' namespace: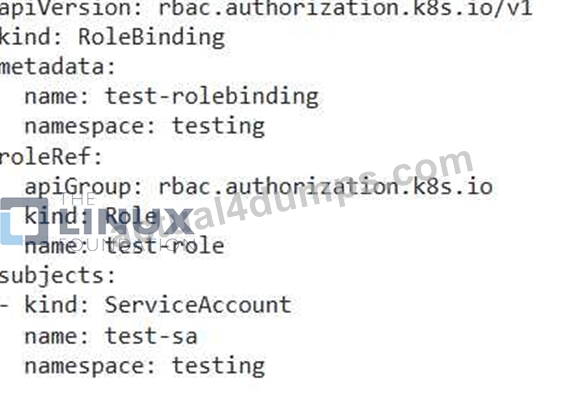
9. Create a RoleBinding for Production Team members in the 'production' namespace: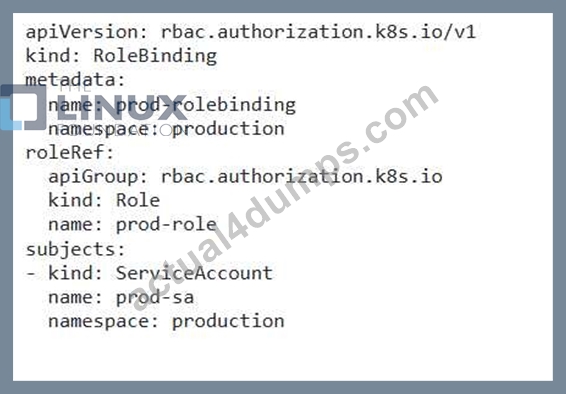
10. Apply the YAML files using 'kubectl apply -f' ,
NEW QUESTION # 46
Create a pod with init container which create a file "test.txt"
in "workdir" directory. Main container should check a file
"test.txt" exists and execute sleep 9999 if the file exists.
- A. // create an initial yaml file with this
kubectl run init-cont-pod --image=alpine --restart=Never --dry-run -o
yaml > init-cont-pod.yaml
// edit the yml as below and create it
vim init-cont-pod.yaml
apiVersion: v1
kind: Pod
metadata:
name: init-cont-pod
labels:
app: myapp
spec:
volumes:
- name: test-volume
emptyDir: {}
containers:
- name: main-container
image: busybox:1.28
command: ['sh', '-c', 'if [ -f /workdir/test.txt ]; then sleep
9999; fi']
volumeMounts:
image: busybox:1.28
command: ['sh', '-c', "mkdir /workdir; echo >
/workdir/test.txt"]
volumeMounts:
- name: test-volume
mountPath: /workdir
// Create the pod
kubectl apply -f init-cont-pod.yaml
kubectl get pods
// Check Events by doing
kubectl describe po init-cont-pod
Init Containers:
init-myservice:
Container ID:
docker://ebdbf5fad1c95111d9b0e0e2e743c2e347c81b8d4eb5abcccdfe1dd74524
0d4f
Image: busybox:1.28
Image ID: dockerpullable://busybox@sha256:141c253bc4c3fd0a201d32dc1f493bcf3fff003b6df
416dea4f41046e0f37d47
Port: <none>
Host Port: <none>
Command:
sh
-c
mkdir /workdir; echo > /workdir/test.txt
State: Terminated Reason: Completed - B. // create an initial yaml file with this
kubectl run init-cont-pod --image=alpine --restart=Never --dry-run -o
yaml > init-cont-pod.yaml
// edit the yml as below and create it
vim init-cont-pod.yaml
apiVersion: v1
kind: Pod
metadata:
name: init-cont-pod
labels:
app: myapp
spec:
volumes:
- name: test-volume
emptyDir: {}
containers:
- name: main-container
image: busybox:1.28
command: ['sh', '-c', 'if [ -f /workdir/test.txt ]; then sleep
9999; fi']
volumeMounts:
- name: test-volume
mountPath: /workdir
initContainers:
- name: init-myservice
image: busybox:1.28
command: ['sh', '-c', "mkdir /workdir; echo >
/workdir/test.txt"]
volumeMounts:
- name: test-volume
mountPath: /workdir
// Create the pod
kubectl apply -f init-cont-pod.yaml
kubectl get pods
// Check Events by doing
kubectl describe po init-cont-pod
Init Containers:
init-myservice:
Container ID:
docker://ebdbf5fad1c95111d9b0e0e2e743c2e347c81b8d4eb5abcccdfe1dd74524
0d4f
Image: busybox:1.28
Image ID: dockerpullable://busybox@sha256:141c253bc4c3fd0a201d32dc1f493bcf3fff003b6df
416dea4f41046e0f37d47
Port: <none>
Host Port: <none>
Command:
sh
-c
mkdir /workdir; echo > /workdir/test.txt
State: Terminated Reason: Completed
Answer: B
NEW QUESTION # 47
Score: 7%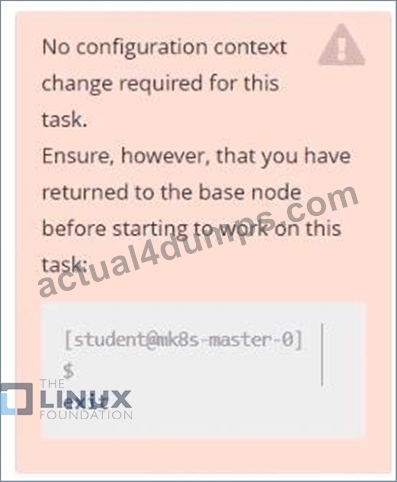
Task
First, create a snapshot of the existing etcd instance running at https://127.0.0.1:2379, saving the snapshot to
/srv/data/etcd-snapshot.db.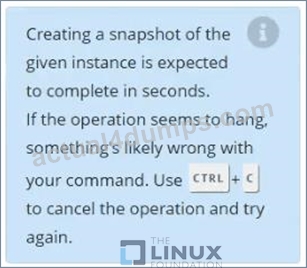
Next, restore an existing, previous snapshot located at /var/lib/backup/etcd-snapshot-previo us.db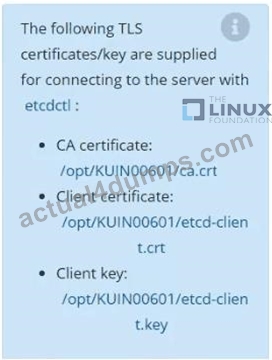
Answer:
Explanation:
Solution:
#backup
ETCDCTL_API=3 etcdctl --endpoints="https://127.0.0.1:2379" --cacert=/opt/KUIN000601/ca.crt --cert=/opt
/KUIN000601/etcd-client.crt --key=/opt/KUIN000601/etcd-client.key snapshot save /etc/data/etcd-snapshot.db
#restore
ETCDCTL_API=3 etcdctl --endpoints="https://127.0.0.1:2379" --cacert=/opt/KUIN000601/ca.crt --cert=/opt
/KUIN000601/etcd-client.crt --key=/opt/KUIN000601/etcd-client.key snapshot restore /var/lib/backup/etcd- snapshot-previoys.db
NEW QUESTION # 48
You are managing a Kubernetes cluster with a complex deployment scenario. The cluster has multiple namespaces, each with its own set of applications and users. You need to create a robust RBAC system to enforce fine-grained access control.
Current Setup:
Namespace: 'dev', 'staging', 'production'
Users: 'developer', 'qa', 'admin'
Applications: 'appl', 'app2' in 'dev', 'app3' in 'staging', 'app4' in 'production' Requirements:
'developer' should be able to access and manage 'appl' and 'app2' in the 'dev' namespace.
'qa' should be able to access and manage 'app3' in the 'staging' namespace.
'admin' should have full cluster-wide access.
Task:
Create the necessary Role, RoleBinding, and ClusterRole objects to implement this RBAC system.
Answer:
Explanation:
See the solution below with Step by Step Explanation.
Explanation:
Solution (Step by Step) :
1. Create Roles for 'developer' and 'qa':

2. Create RoleBinding for 'developer' and 'qa':
3. Create ClusterRole for 'admin'.
4. Create ClusterRoleBindin for 'admin'.
We created separate roles (developer-role', 'cp-role') for each user group, limiting their access to specific namespaces and resources. We bound these roles to users using RoleBindings in the respective namespaces. For 'admin', we created a ClusterRole Cadmin-clusterrole') with full access to all resources, and bound it using a ClusterRoleBinding. This setup ensures that each user has appropriate access rights based on their role and responsibilities. ,
NEW QUESTION # 49
Score: 13%
Task
A Kubernetes worker node, named wk8s-node-0 is in state NotReady. Investigate why this is the case, and perform any appropriate steps to bring the node to a Ready state, ensuring that any changes are made permanent.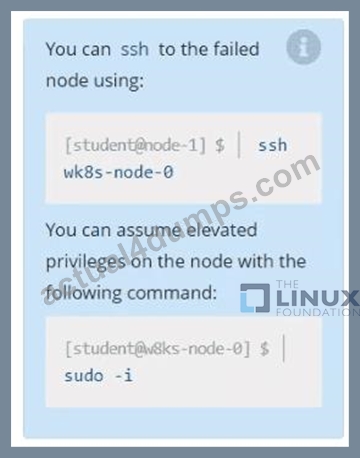
Answer:
Explanation:
Solution:
sudo -i
systemctl status kubelet
systemctl start kubelet
systemctl enable kubelet
NEW QUESTION # 50
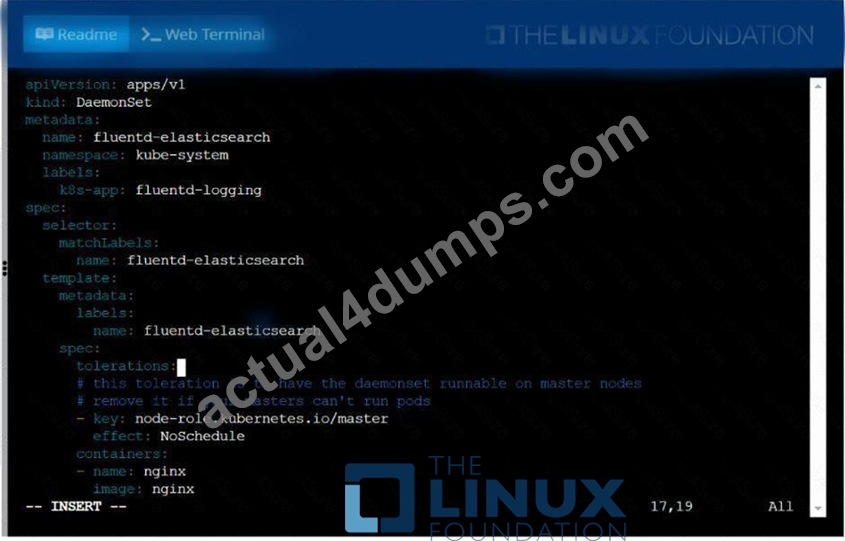
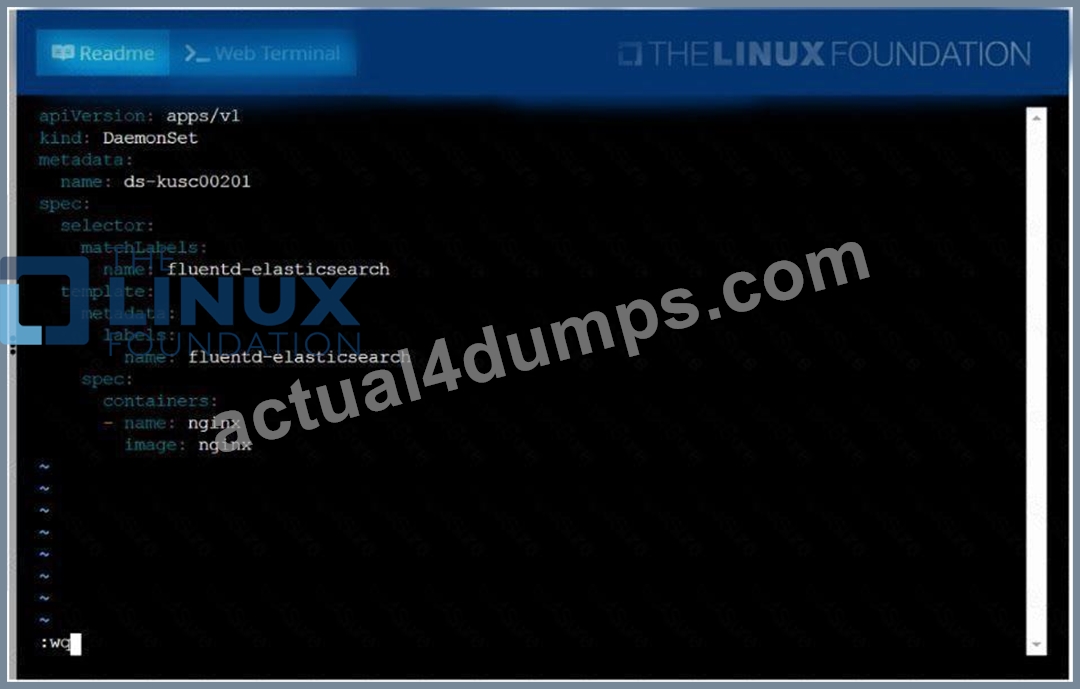
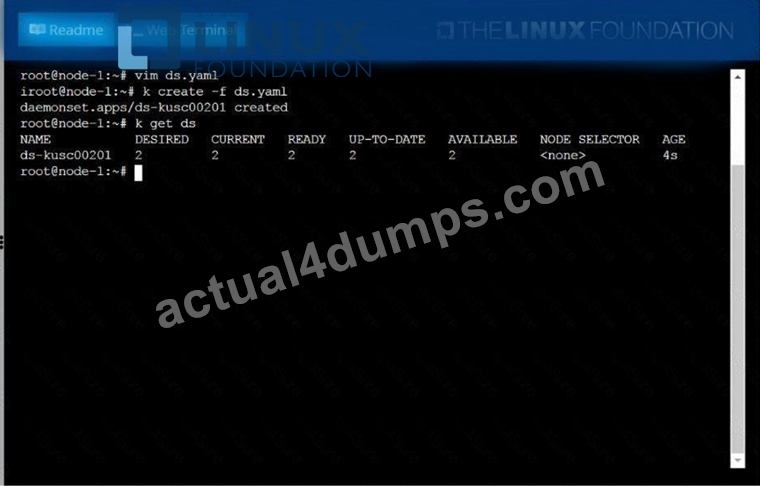
Ensure a single instance of podnginxis running on each node of theKubernetes cluster wherenginxalso represents the Image name whichhas to be used. Do not override anytaints currently in place.
UseDaemonSetto complete thistask and useds-kusc00201asDaemonSet name.
Answer:
Explanation:
See the solution below.
Explanation
solution
NEW QUESTION # 51
Get the pods with labels env=dev and env=prod and output the labels as well
Answer:
Explanation:
kubectl get pods -l 'env in (dev,prod)' --show-labels
NEW QUESTION # 52
Create a pod that echo "hello world" and then exists. Have the pod deleted automatically when it's completed See the solution below.
Answer:
Explanation:
kubectl run busybox --image=busybox -it --rm --restart=Never --
/bin/sh -c 'echo hello world'
kubectl get po # You shouldn't see pod with the name "busybox"
NEW QUESTION # 53
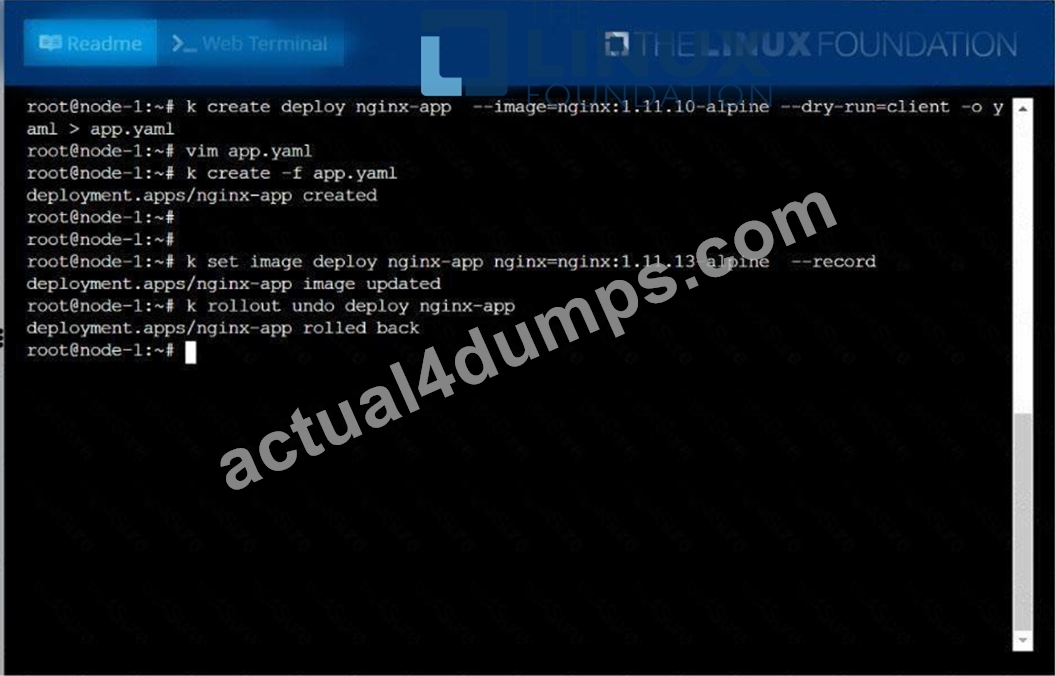
Create a deployment as follows:
* Name:nginx-app
* Using containernginxwithversion 1.11.10-alpine
* The deployment should contain3replicas
Next, deploy the application with newversion1.11.13-alpine, byperforming a rolling update.
Finally, rollback that update to theprevious version1.11.10-alpine.
Answer:
Explanation:
See the solution below.
Explanation
solution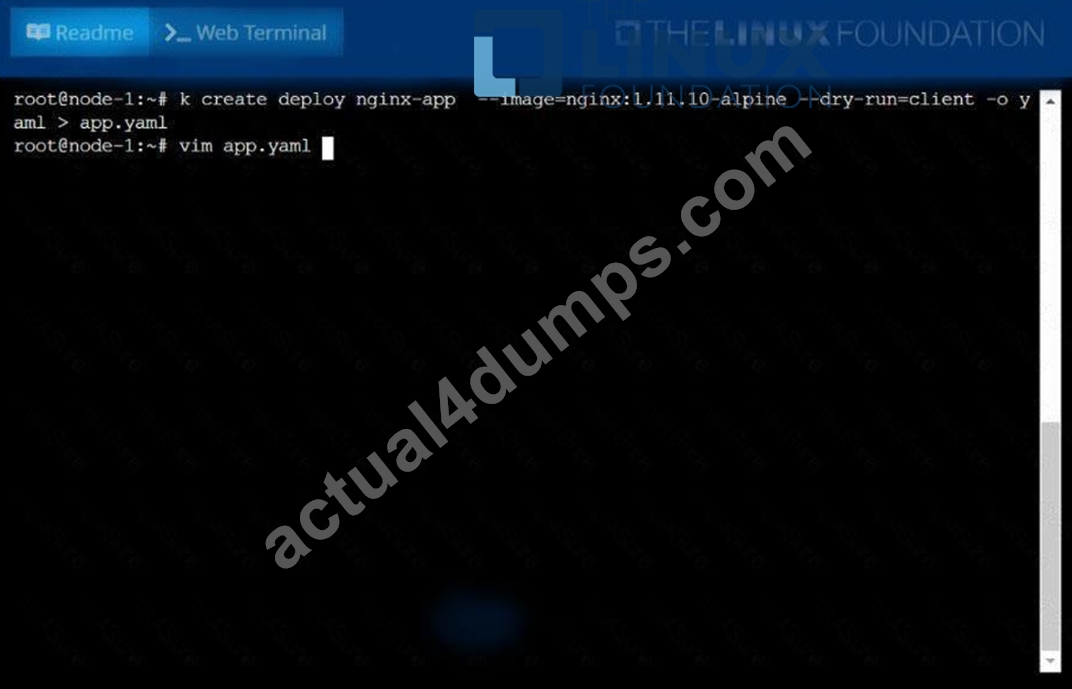

NEW QUESTION # 54
Create a nginx pod with label env=test in engineering namespace
Answer:
Explanation:
kubectl run nginx --image=nginx --restart=Never --labels=env=test --namespace=engineering --dry-run -o yaml > nginx-pod.yaml kubectl run nginx --image=nginx --restart=Never --labels=env=test --namespace=engineering --dry-run -o yaml | kubectl create -n engineering -f - YAML File:
apiVersion: v1
kind: Pod
metadata:
name: nginx
namespace: engineering
labels:
env: test
spec:
containers:
- name: nginx
image: nginx
imagePullPolicy: IfNotPresent
restartPolicy: Never
kubectl create -f nginx-pod.yaml
NEW QUESTION # 55
You have a Deployment running an application that requires a specific network policy. How can you define a network policy that allows only traffic from Pods belonging to the same namespace as the application and denies all other traffic?
Answer:
Explanation:
See the solution below with Step by Step Explanation.
Explanation:
Solution (Step by Step) :
1. Network Policy Definition: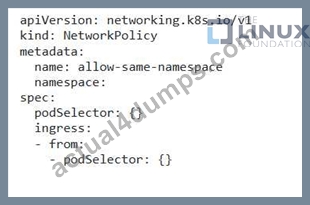
2. Explanation: - 'apiVersion: networking.k8s.io/v1 ' : Specifies the API version for NetworkPolicy resources. - 'kind: NetworkPolicy': Specifies that this is a NetworkPolicy resource. - 'metadata.name: allow-same-namespace': Sets the name of the NetworkPolicy. - 'metadata.namespace: Specifies the namespace where the NetworkPolicy is applied. Replace " with the actual namespace where your deployment is running. - 'spec.podSelector: {F: This empty podSelector means the NetworkPolicy applies to all Pods in the namespace. - 'spec.ingress': This section defines the rules for incoming traffic. - 'spec.ingress.from.podSelector: {F: This allows traffic from any Pods within the same namespace. 3. How it works: - This NetworkPolicy allows incoming traffic only from Pods within the same namespace where the Deployment is running. It explicitly denies all other traffic, effectively isolating the application to communication only within its namespace. 4. Implementation: - Apply the YAML using 'kubectl apply -f allow-same-namespace.yaml' 5. Verification: After applying the NetworkPolicy, test the communication between Pods within the same namespace and Pods in other namespaces. You should observe that the NetworkPolicy successfully enforces the defined restrictions.
NEW QUESTION # 56
Check the image version in pod without the describe command
Answer:
Explanation:
See the solution below.
Explanation
kubectl get po nginx -o
jsonpath='{.spec.containers[].image}{"\n"}'
NEW QUESTION # 57
List all the pods showing name and namespace with a json path expression
Answer:
Explanation:
kubectl get pods -o=jsonpath="{.items[*]['metadata.name',
'metadata.namespace']}"
NEW QUESTION # 58
Check the image version in pod without the describe command
Answer:
Explanation:
kubectl get po nginx -o
jsonpath='{.spec.containers[].image}{"\n"}'
NEW QUESTION # 59
Updates to dynamic user group membership are automatic therefore using dynamic user groups instead of static group objects allows you to:
- A. respond to changes in user behavior and confirmed threats with manual policy changes
- B. respond to changes in user behavior or potential threats without manual policy changes
- C. respond to changes in user behavior or potential threats without automatic policy changes
- D. respond to changes in user behavior or potential threats using manual policy changes
Answer: B
NEW QUESTION # 60
You must connect to the correct host.
Failure to do so may result in a zero score.
[candidate@base] $ ssh Cka000051
Context
You manage a WordPress application. Some Pods are not starting because resource requests are too high.
Your task Is to prepare a Linux system for Kubernetes . Docker is already installed, but you need to configure it for kubeadm .
Task
Complete these tasks to prepare the system for Kubernetes :
Set up cri-dockerd :
. Install the Debian package
~/cri-dockerd_0.3.9.3-0.ubuntu-jammy_am
d64.deb
Debian packages are installed using
dpkg .
. Enable and start the cri-docker service
Configure these system parameters:
. Set net.bridge.bridge-nf-call-iptables to 1
Answer:
Explanation:
Task Summary
You are given a host to prepare for Kubernetes:
* Use dpkg to install cri-dockerd
* Enable and start the cri-docker service
* Set net.bridge.bridge-nf-call-iptables to 1 via sysctl
Step-by-Step Instructions
1## SSH into the correct node
bash
CopyEdit
ssh cka000051
## Required - failure to connect to the correct host = zero score.
2## Install cri-dockerd
You are told the .deb file is already located at:
bash
CopyEdit
~/cri-dockerd_0.3.9.3-0.ubuntu-jammy_amd64.deb
Install it with dpkg:
bash
CopyEdit
sudo dpkg -i ~/cri-dockerd_0.3.9.3-0.ubuntu-jammy_amd64.deb
# If any dependencies are missing (e.g., golang or containerd), you might need:
bash
CopyEdit
sudo apt-get install -f -y
But usually, the exam system provides a pre-validated .deb environment.
3## Enable and start cri-docker service
Start and enable both services:
bash
CopyEdit
sudo systemctl enable cri-docker.service
sudo systemctl enable --now cri-docker.socket
sudo systemctl start cri-docker.service
Check status (optional but smart):
bash
CopyEdit
sudo systemctl status cri-docker.service
You should see it active (running).
4## Configure the sysctl parameter
Set net.bridge.bridge-nf-call-iptables=1 immediately and persistently.
Step A: Apply immediately:
sudo sysctl net.bridge.bridge-nf-call-iptables=1
Step B: Persist it in /etc/sysctl.d:
Create or modify a file:
echo "net.bridge.bridge-nf-call-iptables = 1" | sudo tee /etc/sysctl.d/k8s.conf Reload sysctl:
sudo sysctl --system
Verify:
sysctl net.bridge.bridge-nf-call-iptables
Should return:
net.bridge.bridge-nf-call-iptables = 1
# Now the system is ready for kubeadm with Docker (via cri-dockerd)!
ssh cka000051
sudo dpkg -i ~/cri-dockerd_0.3.9.3-0.ubuntu-jammy_amd64.deb
sudo systemctl enable cri-docker.service
sudo systemctl enable --now cri-docker.socket
sudo systemctl start cri-docker.service
sudo sysctl net.bridge.bridge-nf-call-iptables=1
echo "net.bridge.bridge-nf-call-iptables = 1" | sudo tee /etc/sysctl.d/k8s.conf sudo sysctl --system
NEW QUESTION # 61
Configure the kubelet systemd- managed service, on the node labelled with name=wk8s-node-1, to launch a pod containing a single container of Image httpd named webtool automatically. Any spec files required should be placed in the /etc/kubernetes/manifests directory on the node.
You can ssh to the appropriate node using:
[student@node-1] $ ssh wk8s-node-1
You can assume elevated privileges on the node with the following command:
[student@wk8s-node-1] $ | sudo -i
Answer:
Explanation:
See the solution below.
Explanation
solution
F:\Work\Data Entry Work\Data Entry\20200827\CKA\21 C.JPG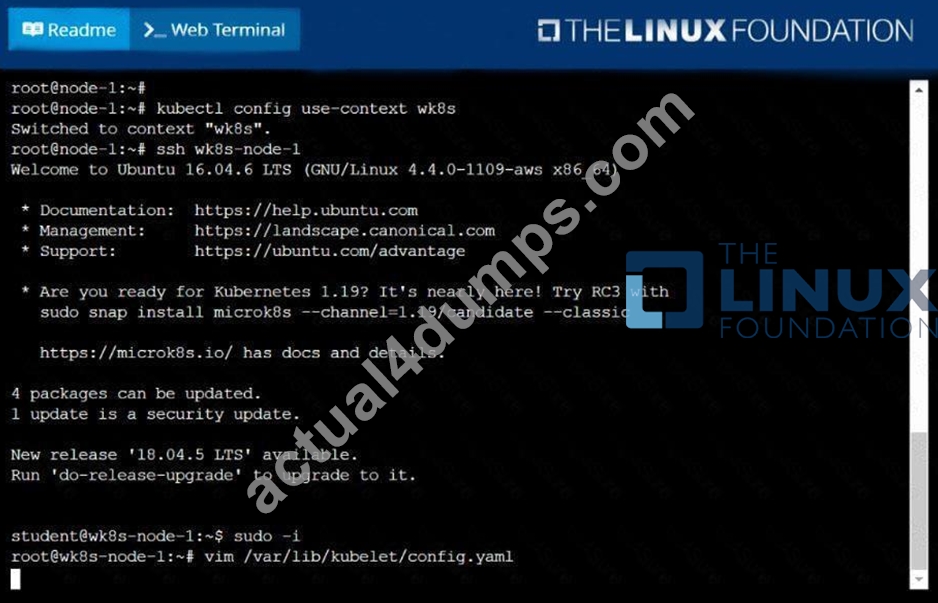
F:\Work\Data Entry Work\Data Entry\20200827\CKA\21 D.JPG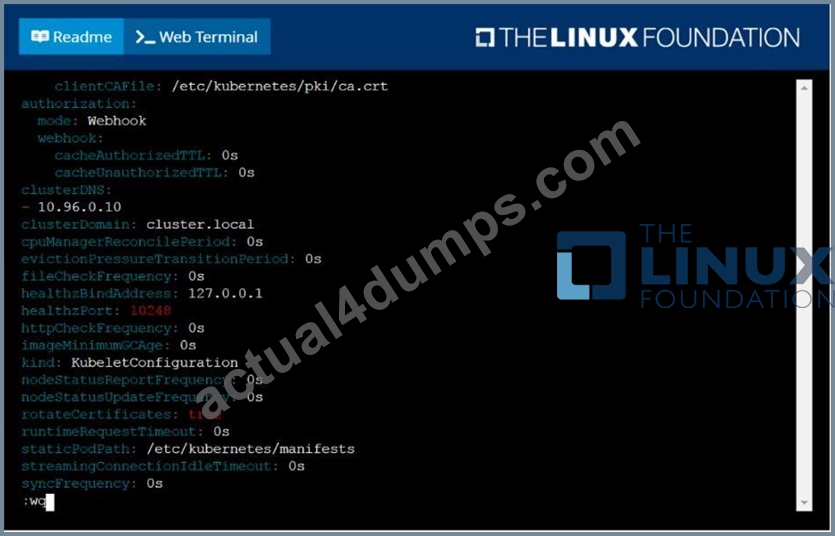
F:\Work\Data Entry Work\Data Entry\20200827\CKA\21 E.JPG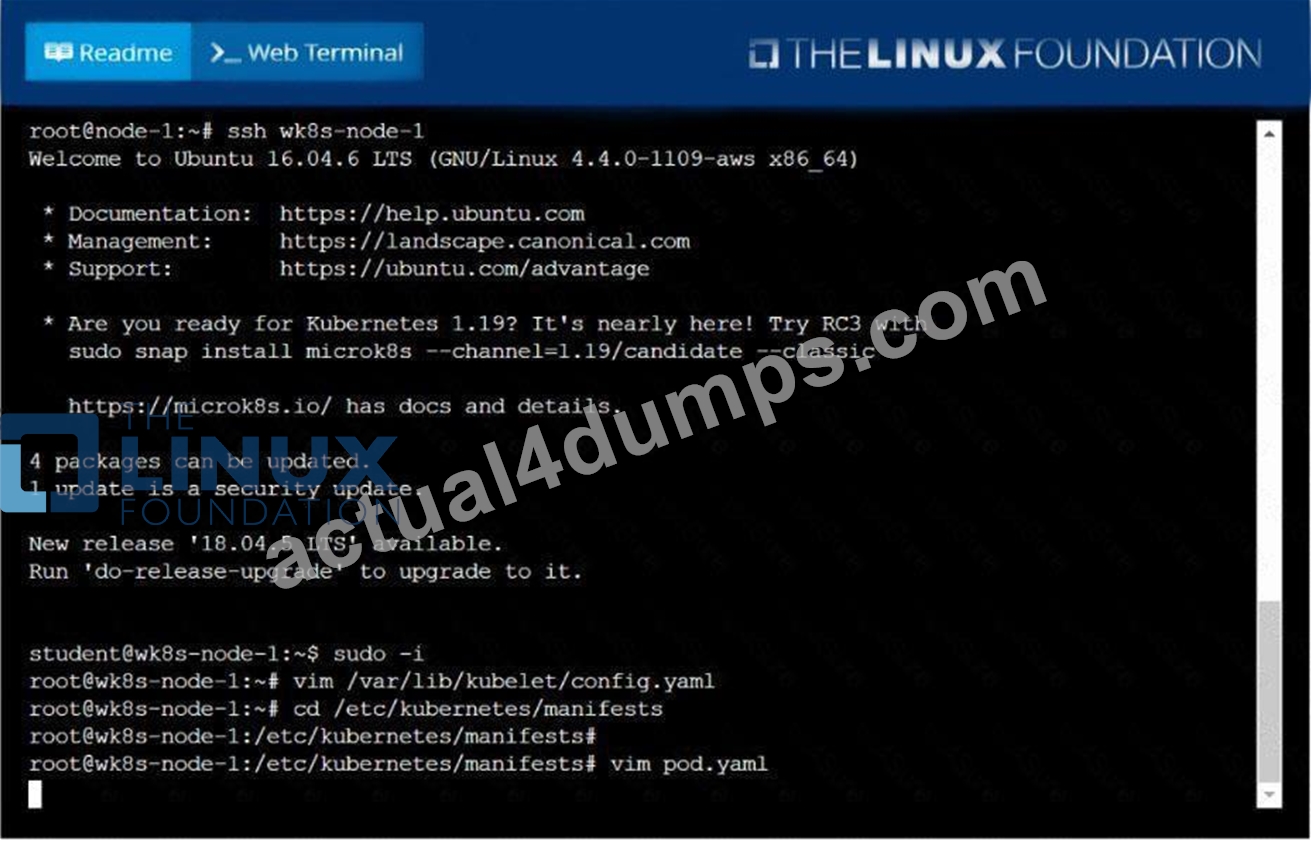
F:\Work\Data Entry Work\Data Entry\20200827\CKA\21 F.JPG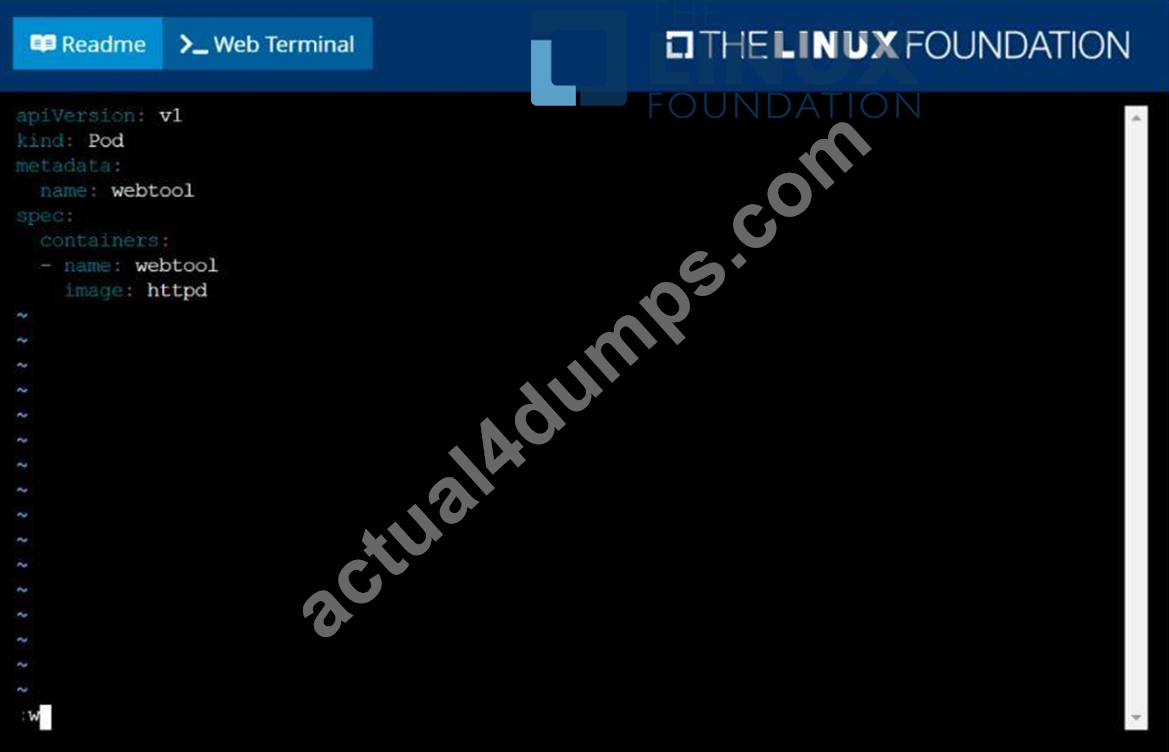
F:\Work\Data Entry Work\Data Entry\20200827\CKA\21 G.JPG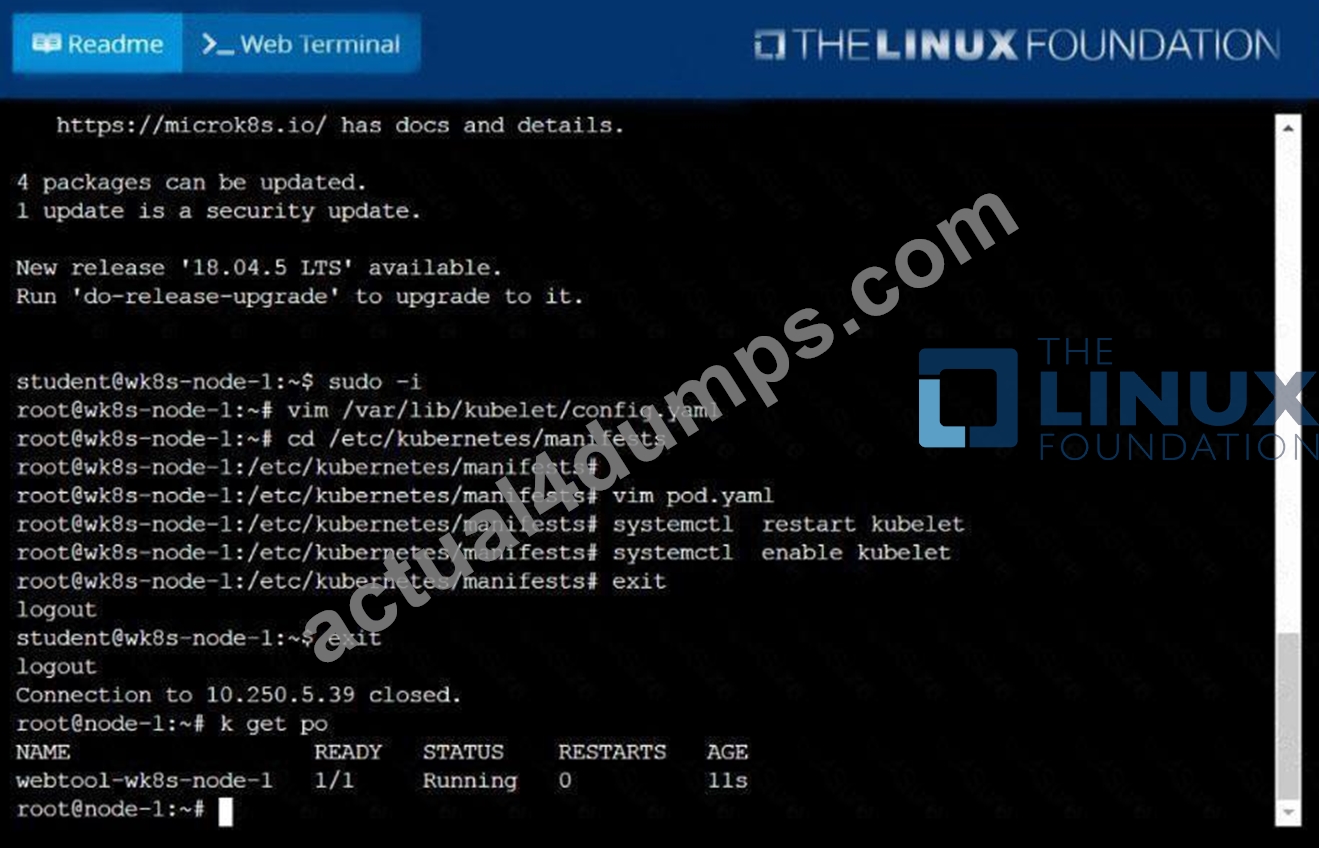
NEW QUESTION # 62
You are managing a Kubernetes cluster with a team of developers. You need to ensure that each developer only has access to the resources they need. For example, Developer A can only access the 'frontend' namespace and deploy applications there.
Developer B can access the 'backend' namespace and manage deployments and services.
Developer C can access the 'monitoring' namespace and access only read-only access to pods and services.
Define the RBAC rules and create the necessary Role, RoleBinding, and ServiceAccount resources to achieve this access control policy.
Answer:
Explanation:
See the solution below with Step by Step Explanation.
Explanation:
Solution (Step by Step) :
1 . Create ServiceAccounts for each Developer:
kubectl create serviceaccount dev-a -n frontend
kubectl create serviceaccount dev-b -n backend
kubectl create serviceaccount dev-c -n monitoring
2. Create Roles for each Developer:
For Developer A:
For Developer B:
For Developer C:
3. Create RoleBindings: For Developer A:
For Developer B:
For Developer C:
NEW QUESTION # 63
Create an nginx pod which loads the secret as environment variables
- A. // create a yml file
kubectl run nginx --image=nginx --restart=Never --dry-run -o
yaml > nginx.yml
// add env section below and create
vim nginx.yaml
apiVersion: v1
kind: Pod
metadata:
labels:
run: nginx
name: nginx
spec:
containers:
- image: nginx
name: nginx
envFrom:
- secretRef:
name: my-secret
restartPolicy: Never
kubectl apply -f nginx.yaml
//verify
kubectl exec -it nginx - env - B. // create a yml file
kubectl run nginx --image=nginx --restart=Never --dry-run -o
yaml > nginx.yml
// add env section below and create
vim nginx.yaml
run: nginx
name: nginx
spec:
containers:
- image: nginx
name: nginx
envFrom:
- secretRef:
name: my-secret
restartPolicy: Never
kubectl apply -f nginx.yaml
//verify
kubectl exec -it nginx - env
Answer: A
NEW QUESTION # 64
Create 2 nginx image pods in which one of them is labelled with env=prod and another one labelled with env=dev and verify the same.
Answer:
Explanation:
See the solution below.
Explanation
kubectl run --generator=run-pod/v1 --image=nginx -- labels=env=prod nginx-prod --dry-run -o yaml > nginx-prodpod.yaml Now, edit nginx-prod-pod.yaml file and remove entries like "creationTimestamp: null"
"dnsPolicy: ClusterFirst"
vim nginx-prod-pod.yaml
apiVersion: v1
kind: Pod
metadata:
labels:
env: prod
name: nginx-prod
spec:
containers:
- image: nginx
name: nginx-prod
restartPolicy: Always
# kubectl create -f nginx-prod-pod.yaml
kubectl run --generator=run-pod/v1 --image=nginx --
labels=env=dev nginx-dev --dry-run -o yaml > nginx-dev-pod.yaml
apiVersion: v1
kind: Pod
metadata:
labels:
env: dev
name: nginx-dev
spec:
containers:
- image: nginx
name: nginx-dev
restartPolicy: Always
# kubectl create -f nginx-prod-dev.yaml
Verify :
kubectl get po --show-labels
kubectl get po -l env=prod
kubectl get po -l env=dev
NEW QUESTION # 65
One of the nodes in your Kubernetes cluster is experiencing high CPU usage, which is affecting the performance of the entire cluster. The node is running multiple pods, and you need to identify which pod is responsible for the high CPU consumption and take steps to resolve the issue.
Answer:
Explanation:
See the solution below with Step by Step Explanation.
Explanation:
Solution (Step by Step) :
1. Identify the High-CPU Node:
- Use 'kubectl top nodes' to view the CPU usage of each node in the cluster.
- Identify the node that is experiencing the high CPU usage.
2. List Pods on the Node:
- Use 'kubectl get pods -R to list all pods in the cluster.
- Filter the pods to find those running on the high-CPU node.
- For example, 'kubectl get pods -A I grep
3. Monitor Pod CPU Usage:
- Use 'kubectl top pod -n to view the CPU usage of each pod running on the node.
- Pay attention to the CPU usage metrics for each container within the pod.
4. Examine Pod Logs:
- Use "kubectl logs -f to view the logs of the suspected high-CPU pod.
- Search for any error messages, stack traces, or other indications that the pod is experiencing excessive CPU utilization.
5. Analyze Pod Resource Requests and Limits:
- Check the pod's resource requests and limits using 'kubectl describe pod
- Ensure that the pod is not requesting or using significantly more CPU resources than it needs.
- If the CPU requests are too high, the pod might be consuming excessive CPU even when idle.
6. Troubleshooting Options:
- Based on the analysis of the logs and resource usage:
- Adjust resource limits: If the pod is requesting too much CPU, reduce its CPU requests and limits in the Deployment YAML.
- Optimize container images: Use a smaller container image to reduce the resource footprint.
- Improve application code: Identify and address any inefficient code that is causing high CPU usage.
- Scale down the pod replicas: If the pod's workload is high, reduce the number of replicas to distribute the load across fewer pods.
- Consider using a different pod scheduling strategy: For example, use a node selector or taint to run the pod on a dedicated node with more resources.
7. Monitor and Adjust:
- After making changes to the pod's resources or configuration, monitor the node's CPU usage:
- Use 'kubectl top nodes' and 'kubectl top pod' to observe the impact of the changes.
- Adjust the configuration further if needed: Continue to optimize the pod's resource usage to bring the node's CPU usage back to a healthy level.
NEW QUESTION # 66
Score: 5%
Task
Monitor the logs of pod bar and:
* Extract log lines corresponding to error
* Write them to /opt/KUTR00101/bar
Answer:
Explanation:
See the solution below.
Explanation
Solution:
kubectl logs bar | grep 'unable-to-access-website' > /opt/KUTR00101/bar cat /opt/KUTR00101/bar
NEW QUESTION # 67
......
The CKA program is suitable for professionals who are interested in deploying, managing, and scaling containerized applications. Certified Kubernetes Administrator (CKA) Program Exam certification exam is intended for system administrators, DevOps engineers, and developers who are seeking to enhance their skills in Kubernetes administration. The CKA exam is a challenging test that requires a deep understanding of Kubernetes architecture, containerization concepts, and network design. CKA exam aims to validate the candidate's expertise in Kubernetes administration and help them stand out in the job market.
Powerful CKA PDF Dumps for CKA Questions: https://www.actual4dumps.com/CKA-study-material.html
Authentic CKA Dumps - Free PDF Questions to Pass: https://drive.google.com/open?id=1hTCuAHa4IhQd7_bjF8btDxQf2hEp9jY7